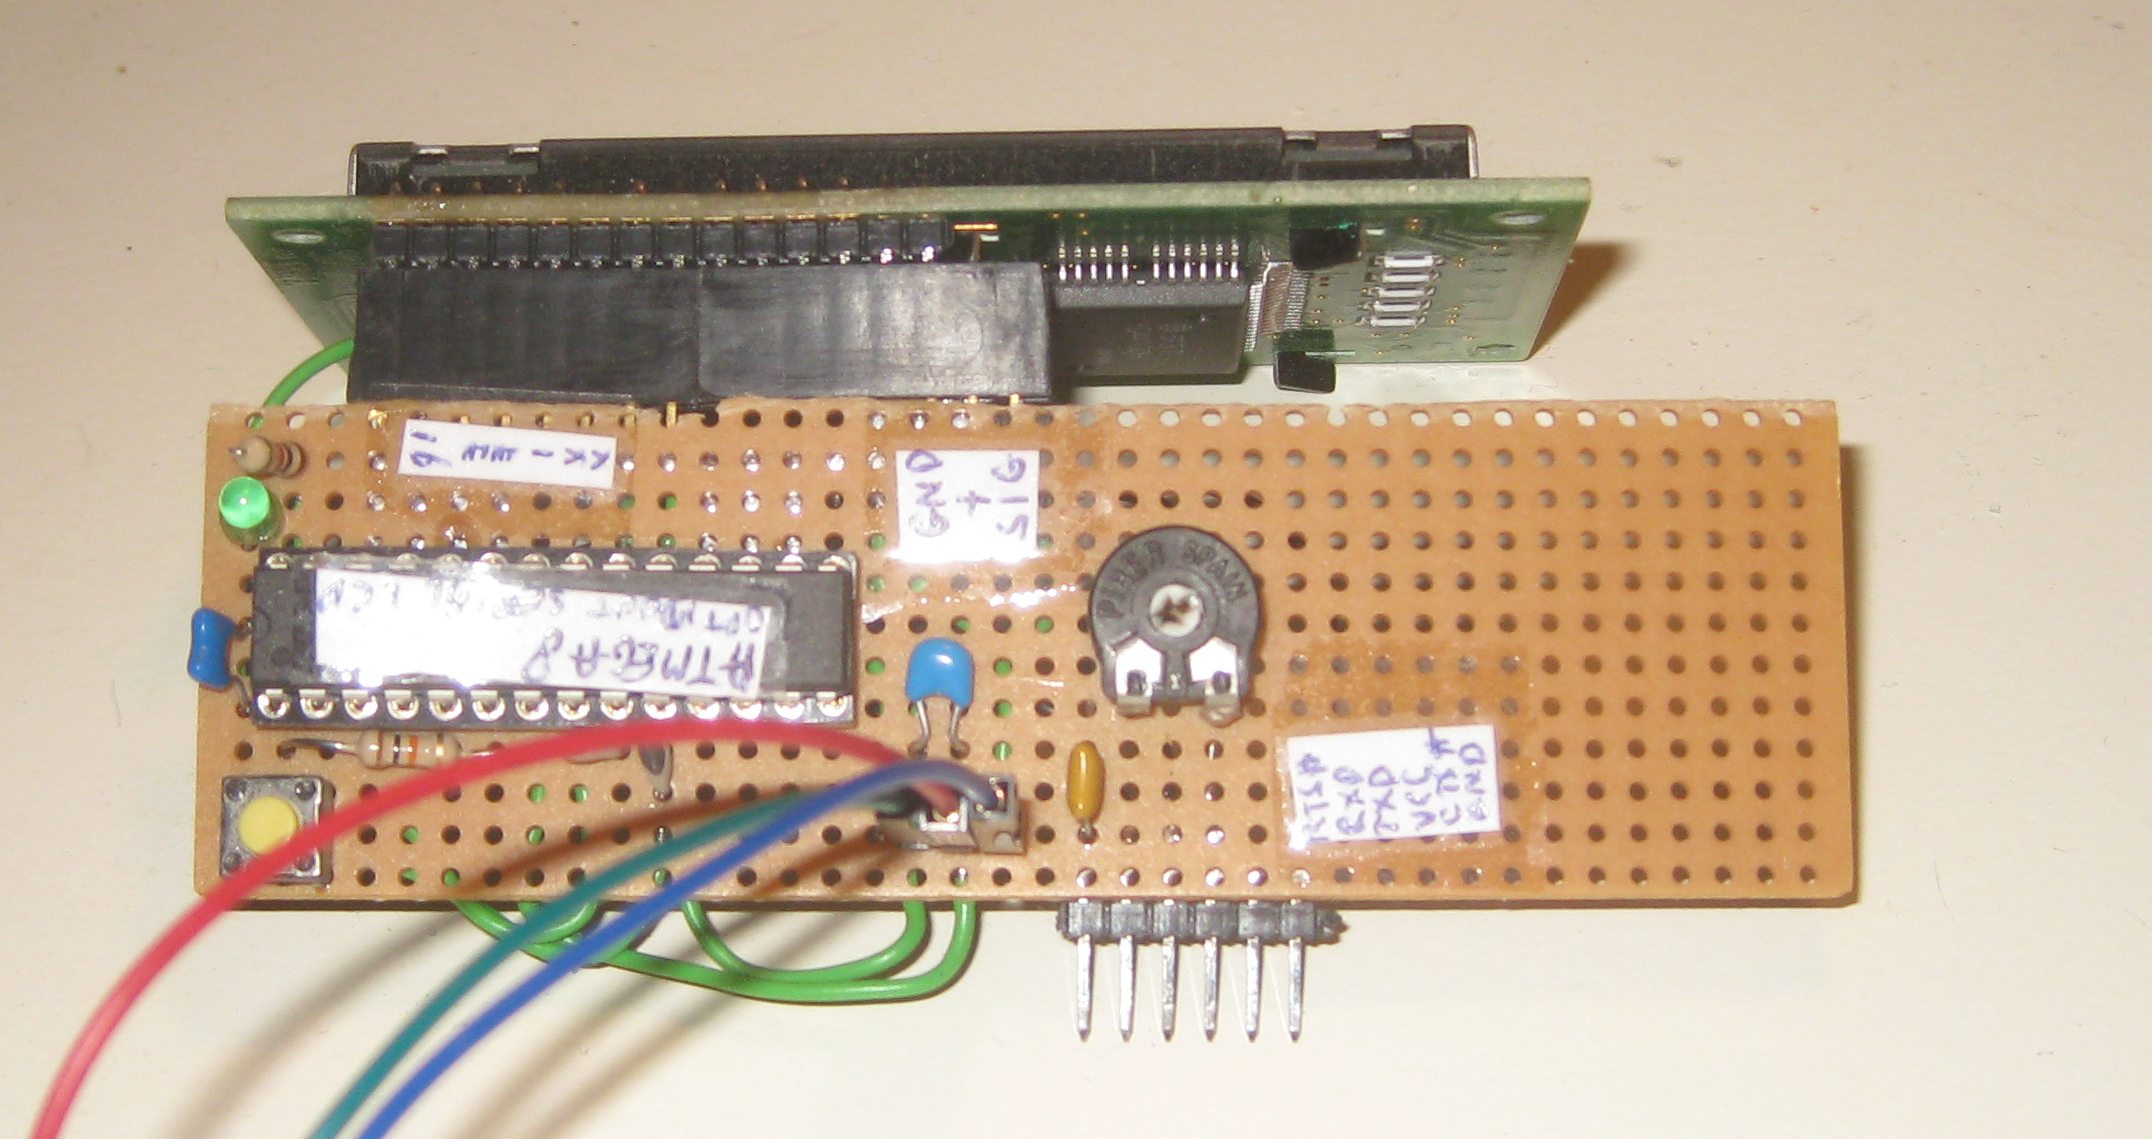
Made this Serial LCD using an Atmega8 the arduino bootloader and some code.
The design of the schematic came from sparkfun (Jimbloom). I had to make some modifications to the connections to give less soldering and those changes can be found on the arduino software.
The original sparkfun firmware was upgraded by s ridenour and can be found here. This improved software allows user defined characters, displays the baud rate that has been set (easy to forget) and still allows the functions from the previous firmware, such as user programmable splash screen and all the cursor and screen manipulation stuff that the controller allows.
This is a small program to talk to the device from an arduino.
[spoiler]
// SparkFun Serial LCD example 1
// Clear the display and say "Hello World!"

// This sketch is for Arduino versions 1.0 and later
// If you're using an Arduino version older than 1.0, use
// the other example code available on the tutorial page.

// Use the softwareserial library to create a new "soft" serial port
// for the display. This prevents display corruption when uploading code.
#include <SoftwareSerial.h>
// Only the 5 least significant bits are used, the 3 upper bits are ignored
uint8_t sf_flame[8] = {
   0b00000110,
   0b00001100,
   0b00001101,
   0b00000111,
   0b00010011,
   0b00011111,
   0b00011110,
   0b00011100
};
// Attach the serial display's RX line to digital pin 2
SoftwareSerial mySerial(3,2); // pin 2 = TX, pin 3 = RX (unused)

void setup()
{
  mySerial.begin(9600); // set up serial port for 9600 baud
  delay(500); // wait for display to boot up
}

void loop()
{
  mySerial.write(0xFE); // Special command
  mySerial.write(0x01); // Clear Screen & Home cursor
  mySerial.write("Hello, world!");
  mySerial.write(0xFE); // Special command
  mySerial.write(0x80); // Set cursor postion
  mySerial.write(byte(16)); // beginning of second line
  mySerial.write("2nd line    !");
  mySerial.write(0xFE);   // Special command
  mySerial.write(0x64);   // Custom character command
  mySerial.write(byte(0));   // Custom character 0 (LCD's CGRAM address 0)
  for(int i = 0; i < 8; i++) {   // Send it over one byte at a time
  mySerial.write((sf_flame[i]));
  }
// Now to show it, we just print ASCII 0 (ASCII 0 = custom char. 0, ASCII 1 = custom char. 1, etc.)
  mySerial.write(byte(0));
  while(1); // wait forever
}
[/spoiler]
The firmware you can view below and download from here.
[spoiler]
/*
  Serial Enabled LCD Kit
  by: Jim Lindblom - SparkFun Electronics
  Characters received in a serial stream are displayed on a 16x2,
  20x4, etc. LCD. Special commands are also available to clear, scroll
  display cursors and other functions.

  License: Beerware - As long as you retain this notice you
  can do whatever you want with this stuff. If we meet some day,
  and you think this stuff is worth it, you can buy
  me a beer in return.

  Revisions:
  03/08/11 - Added support for custom characters, see special command 0x64
  03/08/11 - Splash screen prints the baud rate, in case you messed up.
  9/29/10 - Added support for 20x4, 16x4 and 20x2 LCDs.
  See special commands 0x03 through 0x06. LCD size is stored
  in EEPROM and retained upon loss of power.

  The circuit:
  * LCD RS pin to digital pin 2
  * LCD R/W pin to digital pin 3
  * LCD Enable pin to digital pin 4
  * LCD D4 pin to digital pin 5
  * LCD D5 pin to digital pin 6
  * LCD D6 pin to digital pin 7
  * LCD D7 pin to digital pin 8
  * 10K resistor:
  * ends to +5V and ground
  * wiper to LCD VO pin (pin 3)

  Uses the LiquidCrystal Arduino library to control the LCD
  ---------------------------------------------------------
  http://www.arduino.cc/en/Tutorial/LiquidCrystal
  Much thanks to: Limor Fried, Tom Igoe, David A. Mellis
  for their fantastic work on this library!
*/

#include <LiquidCrystal.h>
#include <EEPROM.h>

// --- EEPROM ADDRESS DEFINITIONS
#define LCD_BACKLIGHT_ADDRESS 1  // EEPROM address for backlight setting
#define BAUD_ADDRESS 2  // EEPROM address for Baud rate setting
#define SPLASH_SCREEN_ADDRESS 3 // EEPROM address for splash screen on/off
#define ROWS_ADDRESS 4  // EEPROM address for number of rows
#define COLUMNS_ADDRESS 5  // EEPROM address for number of columns

// --- SPECIAL COMMAND DEFINITIONS
#define BACKLIGHT_COMMAND 128  // 0x80
#define SPECIAL_COMMAND 254 // 0xFE
#define BAUD_COMMAND 129  // 0x81

// --- ARDUINO PIN DEFINITIONS

uint8_t RSPin = 10;
uint8_t RWPin = 11;
uint8_t ENPin = 12;
uint8_t D4Pin = 14;
uint8_t D5Pin = 15;
uint8_t D6Pin = 16;
uint8_t D7Pin = 17;
uint8_t BLPin = 13;

char inKey;  // Character received from serial input
uint8_t Cursor = 0;  // Position of cursor, 0 is top left, (rows*columns)-1 is bottom right
uint8_t LCDOnOff = 1;  // 0 if LCD is off
uint8_t blinky = 0;  // Is 1 if blinky cursor is on
uint8_t underline = 0; // Is 1 if underline cursor is on
uint8_t splashScreenEnable = 1;  // 1 means splash screen is enabled
uint8_t rows = 2;  // Number rows, will be either 2 or 4
uint8_t columns = 16; // Number of columns, will be 16 or 20
uint8_t characters; // rows * columns

// initialize the LCD at pins defined above
LiquidCrystal lcd(RSPin, RWPin, ENPin, D4Pin, D5Pin, D6Pin, D7Pin);

/* ----------------------------------------------------------
  In the setup() function, we'll read the previous baud,
  screen size, backlight brightness, and splash screen state
  from EEPROM. Serial will be started at the proper baud, the
  LCD will be initialized, backlight turned on, and splash
  screen displayed (or not) according to the EEPROM states.
  ----------------------------------------------------------*/
void setup(){
  // initialize the serial communications:
  setBaudRate(EEPROM.read(BAUD_ADDRESS));

  // Read rows and columns from EEPROM
  // Will default to 2x16, if not previously set
  rows = EEPROM.read(ROWS_ADDRESS);
  if (rows != 4)
    rows = 2;
  columns = EEPROM.read(COLUMNS_ADDRESS);
  if (columns != 20)
    columns = 16;

  // set up the LCD's number of rows and columns:
  lcd.begin(columns, rows);

  // Set up the backlight
  pinMode(BLPin, OUTPUT);
  setBacklight(EEPROM.read(LCD_BACKLIGHT_ADDRESS));

  // Do splashscreen if set
  splashScreenEnable = EEPROM.read(SPLASH_SCREEN_ADDRESS);
  if (splashScreenEnable!=0)
  {
    if (columns == 16)
    {
      lcd.print("www.SparkFun.com");
      lcd.setCursor(0, 1);
      lcd.print(" Serial LCD Kit ");
      delay(1000);
      lcd.clear();
    }
    else
    {
      lcd.setCursor(0, 1);
      lcd.print(" www.SparkFun.com ");
      lcd.setCursor(0, 2);
      lcd.print(" Serial LCD Kit ");
      delay(1000);
      lcd.clear();
    }
    lcd.setCursor(0,0);
    lcd.print("Baud setting:");
    lcd.setCursor(0,1);
    lcd.print(EEPROM.read(BAUD_ADDRESS), DEC);
    delay(1000);
    lcd.clear();
  }
}

/*----------------------------------------------------------
  In loop(), we wait for a serial character to be
  received. Once received, the character is checked against
  all the special commands if it's not a special command the
  character (or tab, line feed, etc.) is displayed. If it is
  a special command another loop will be entered and we'll
  again wait for any further characters that are needed to
  finish the command.
  ----------------------------------------------------------*/
void loop()
{
    while (Serial.available() > 0) {
      inKey = Serial.read();
      // Check for special LCD command
      if ((inKey&0xFF) == SPECIAL_COMMAND)
        SpecialCommands();
      // Backlight control
      else if ((inKey&0xFF) == BACKLIGHT_COMMAND)
      {
        // Wait for the next character
        while(Serial.available() == 0)
          ;
        setBacklight(Serial.read());
      }
      // baud rate control
      else if ((inKey&0xFF) == BAUD_COMMAND)
      {
        // Wait for the next character
        while(Serial.available() == 0)
          ;
        setBaudRate(Serial.read());
      }
      // backspace
      else if (inKey == 8)
      {
        Cursor--;
        LCDDisplay(0x20);
        Cursor--;
      }
      // horizontal tab
      else if (inKey == 9)
        Cursor += 5;
      // line feed
      else if (inKey == 10)
        Cursor += columns - Cursor%columns;
      // carriage return
      else if (inKey == 13)
        Cursor += columns;
      // finally (since no special commad received), just display the received character
      else
        LCDDisplay(inKey);
    }
}

/* ----------------------------------------------------------
  SpecialCommands() is reached if SPECIAL_COMMAND is received.
  This function will wait for another character from the serial
  input and then perform the desired command. If a command is
  not recognized, nothing further happens and we jump back into
  loop().
  ----------------------------------------------------------*/
void SpecialCommands()
{
  // Wait for the next character
  while(Serial.available() == 0)
    ;
  inKey = Serial.read();
  // Clear Display
  if (inKey == 1)
  {
    Cursor = 0;
    lcd.clear();
  }
  // Move cursor right one
  else if (inKey == 20)
    Cursor++;
  // Move cursor left one
  else if (inKey == 16)
    Cursor--;
  // Scroll right
  else if (inKey == 28)
    lcd.scrollDisplayRight();
  // Scroll left
  else if (inKey == 24)
    lcd.scrollDisplayLeft();
  // Turn display on
  else if ((inKey == 12)&&(LCDOnOff==0))
  {
    LCDOnOff = 1;
    lcd.display();
  }
  // Turn display off
  else if (inKey == 8)
  {
    LCDOnOff = 0;
    lcd.noDisplay();
  }
  // Underline Cursor on
  else if (inKey == 14)
  {
    underline = 1;
    blinky = 0;
    lcd.noBlink();
    lcd.cursor();
  }
  // Underline Cursor off
  else if ((inKey == 12)&&(underline==1))
  {
    underline = 0;
    lcd.noCursor();
  }
  // Blinking box cursor on
  else if (inKey == 13)
  {
    lcd.noCursor();
    lcd.blink();
    blinky = 1;
    underline = 0;
  }
  // Blinking box cursor off
  else if ((inKey == 12)&&(blinky=1))
  {
    blinky = 0;
    lcd.noBlink();
  }
  // Set Cursor position
  else if ((inKey&0xFF) == 128)
  {
    // Wait for the next character
    while(Serial.available() == 0)
      ;
    inKey = Serial.read();
    Cursor = inKey;
  }
  else if (inKey == 30)
  {
    if (splashScreenEnable)
      splashScreenEnable = 0;
    else
      splashScreenEnable = 1;
    EEPROM.write(SPLASH_SCREEN_ADDRESS, splashScreenEnable);
  }
  else if (inKey == 3)
  {
    // 20 columns
    columns = 20;
    EEPROM.write(COLUMNS_ADDRESS, columns);
    lcd.begin(columns, rows);
    Cursor = 0;
  }
  else if (inKey == 4)
  {
    // 16 columns
    columns = 16;
    EEPROM.write(COLUMNS_ADDRESS, columns);
    lcd.begin(columns, rows);
    Cursor = 0;
  }
  else if (inKey == 5)
  {
    // 4 lines
    rows = 4;
    EEPROM.write(ROWS_ADDRESS, rows);
    lcd.begin(columns, rows);
    Cursor = 0;
  }
  else if (inKey == 6)
  {
    // 2 lines
    rows = 2;
    EEPROM.write(ROWS_ADDRESS, rows);
    lcd.begin(columns, rows);
    Cursor = 0;
  }
  else if (inKey == 0x64)
  {
      uint8_t newChar[8];
      uint8_t which;
      int i;
      // wait to find out which of the 8 possible (0-7) custom chars we're using
      while(Serial.available() == 0)
          ;
      which = Serial.read();
      // read it in
      for(i = 0; i < 8; i++) {
          // we can't assume all 8 bytes will be sent in quick succession, especially if the user
          // sends them one at a time via Serial.print(somebyte, BYTE) or somesuch.
          while(Serial.available() == 0)
              ;
          newChar[i] = Serial.read();
      }
      // if it's one of the writable characters, set it, otherwise just ignore it
      if(which >= 0 && which <= 7) {
          lcd.createChar(which, newChar);
      }
  }
}

/* ----------------------------------------------------------
  LCDDisplay() receives a single character and displays it
  depending on what value is in Cursor. We also do a bit of
  manipulation on Cursor, if it is beyond the screen size.
  Finally the Cursor is advanced one value, before the function
  is exited.
  ----------------------------------------------------------*/
void LCDDisplay(char character)
{
  int currentRow = 0;
  characters = rows * columns;

  // If Cursor is beyond screen size, get it right
  while (Cursor >= characters)
    Cursor -= characters;
  while (Cursor < 0)
    Cursor += characters;

  if (Cursor >= columns)
    currentRow = Cursor/columns;

  lcd.setCursor(Cursor%columns, currentRow);
  lcd.write(character);

  Cursor++;
}

/* ----------------------------------------------------------
  setBacklight() is called from SpecialCommands(). It receives
  a backlight setting between 0 and 255. The backlight is set
  accordingly (via analogWrite()). Before exit the new backlight
  value is written to EEPROM.
  ----------------------------------------------------------*/
void setBacklight(uint8_t backlightSetting)
{
  analogWrite(BLPin, backlightSetting);
  EEPROM.write(LCD_BACKLIGHT_ADDRESS, backlightSetting);
}

/* ----------------------------------------------------------
  setBaudRate() is called from SpecialCommands(). It receives
  a baud rate setting balue that should be between 0 and 10.
  The baud rate is then set accordingly, and the new value is
  written to EEPROM. If the EEPROM value hasn't been written
  before (255), this function will default to 9600. If the value
  is out of bounds 10<baud<255, no action is taken.
  ----------------------------------------------------------*/
void setBaudRate(uint8_t baudSetting)
{
  // If EEPROM is unwritten (0xFF), set it to 9600 by default
  if (baudSetting==255)
    baudSetting = 4;

  switch(baudSetting)
  {
    case 0:
      Serial.begin(300);
      break;
    case 1:
      Serial.begin(1200);
      break;
    case 2:
      Serial.begin(2400);
      break;
    case 3:
      Serial.begin(4800);
      break;
    case 4:
      Serial.begin(9600);
      break;
    case 5:
      Serial.begin(14400);
      break;
    case 6:
      Serial.begin(19200);
      break;
    case 7:
      Serial.begin(28800);
      break;
    case 8:
      Serial.begin(38400);
      break;
    case 9:
      Serial.begin(57600);
      break;
    case 10:
      Serial.begin(115200);
      break;
    default:
      Serial.begin(9600);
      baudSetting = 4;
  }

  if ((baudSetting>=0)&&(baudSetting<=10)) {
    EEPROM.write(BAUD_ADDRESS, baudSetting);
  }
}
[/spoiler]
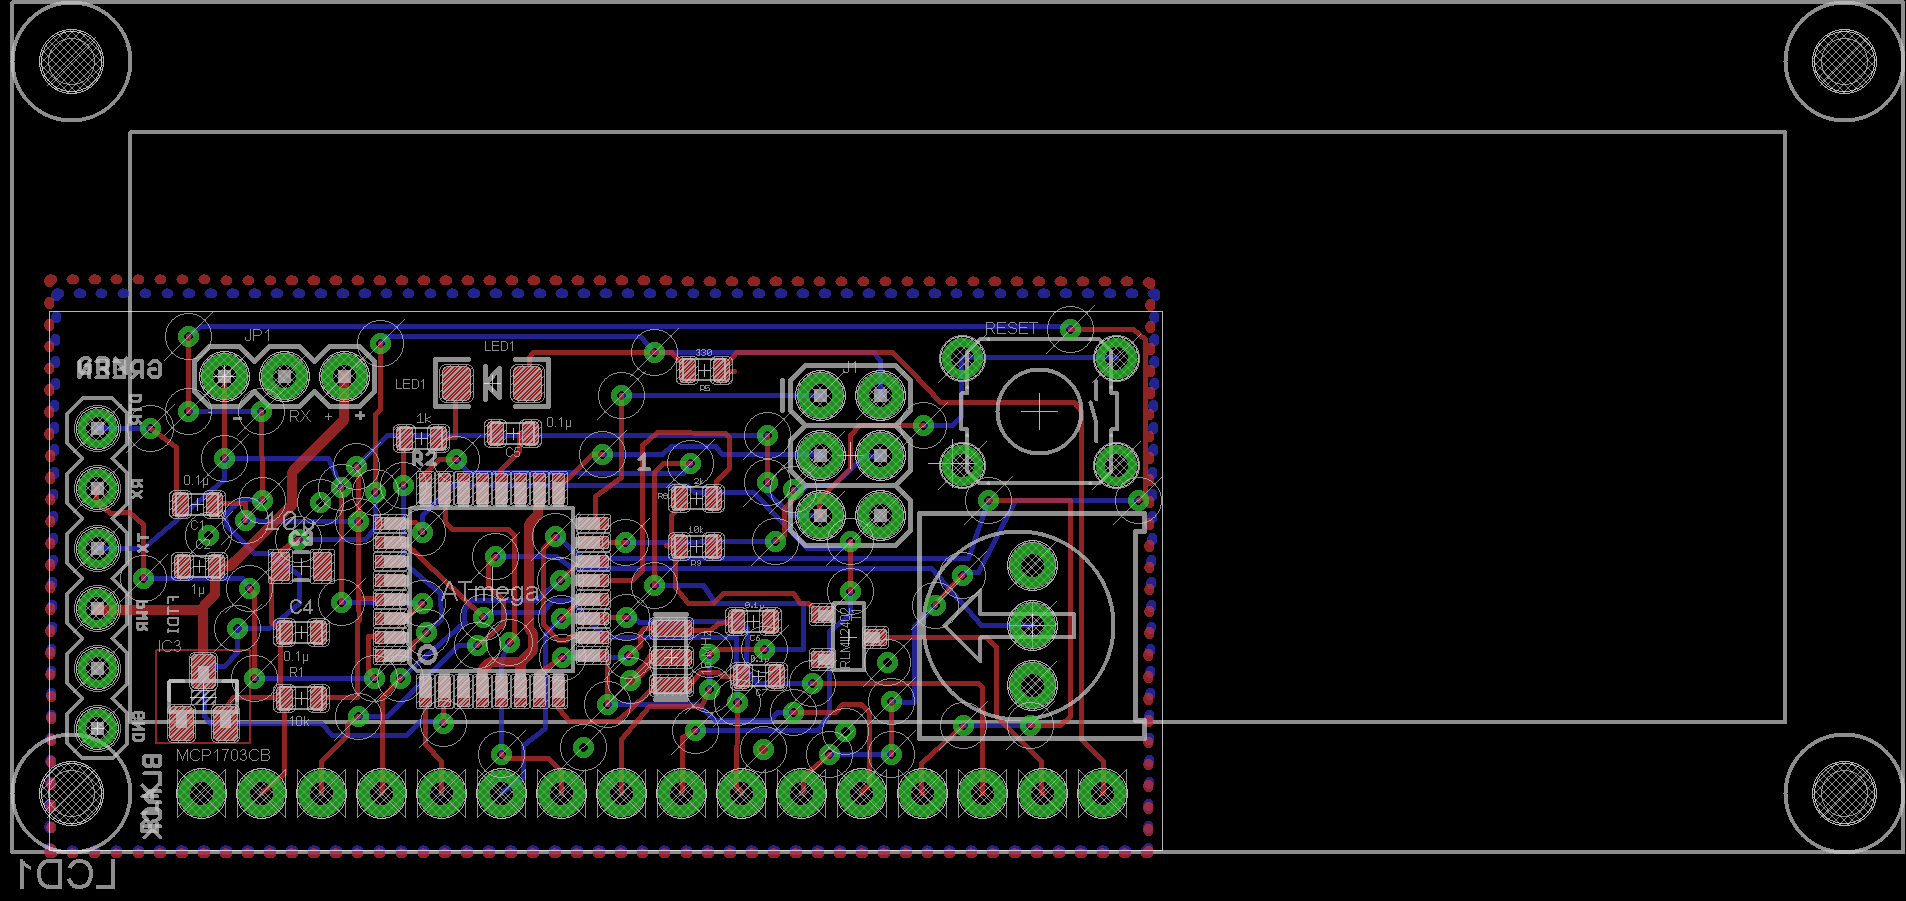
serial lcd design and schematic
The above pictures show the prototype serial LCD . After this i designed a small PCB which has the same functionality.
When this has been properly tested it will be available in the shop. In the mean time you can view the serial LCD schematic and layout designs.
In the mean time here is the design.
Serial LCD schematic Serial LCD board


